How to use Fibonacci Ratio Retracements
As a technical trader, you would have often wondered how to use Fibonacci ratio retracements effectively. Should we use the extreme points, or should we use the closing prices of the extremities of moves? You have come to the right place, as I am going to explain to you the most important details that will help you in your trading activities.
Most 'theorists' among technical analysts would, incorrectly, always choose the extremities of a move to draw Fibonacci retracements. Some others use closing prices at the extremities to measure and produce the Fibonacci ratio retracements. This formulaic approach will yield unsatisfactory results in the long run.
Choosing the right place to draw Fibonacci ratio retracements could mark the difference between success and failure in trading decisions.
Example of an INCORRECT use Fibonacci Ratio Retracements in real-world trading
We will start with an example of a daily chart of the Sterling Pound vs the US Dollar. Observe the Refinitive Eikon symbol for this at the top left of the chart showing GBP. Imagine you are a regular trader who has read extensively about Fibonacci ratios. But no one has really explained the correct way to use this important technical tool.
So, you place one end of the Fibonacci tool at the low of 1.3647 marked as point “1” on the chart. Then you draw the Fibonacci grid by placing the other end at the upper end of this movement to the level of 1.4783 marked as point “2” on the chart. You observe the 61.8% retracement level coming at 1.4081 and placed your buy order a few points above that, perhaps at 1.4090. Guess what happened!
Well, the marked dipped only to 1.4108 and rallied all the way back to over 1.5100. You would have missed a great opportunity to make some easy money. Why? Blame it on the incorrect way of using Fibonacci ratio retracements. Such an approach would often result in their missing a good move because the market falls just short of their ideal retracement levels.
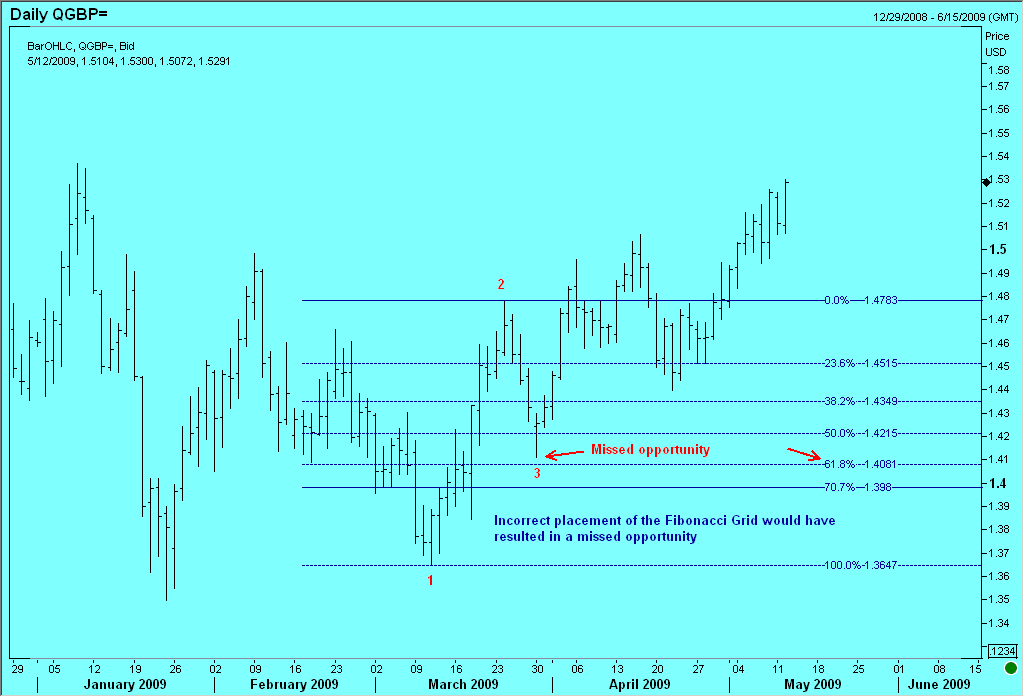
The above chart shows the 'wrong' way to draw Fibonacci retracements. So, what is the better way to do this?
The practicing professional would spend a few extra minutes to see what were the pressure points in recent history and choose to ignore the spikes that shows up ever so often. Why make the same mistake as some poor trader whose stops were run in by the market at the extremities?
Example of how to CORRECTLY use Fibonacci Ratio Retracements in real-world trading
Here is a demonstration of the outcome using the chart of Sterling Pound. The same technique for using Fibonacci ratio retracements works equally well, whether you are considering the chart of a stock, an index, forex or a commodity. Learning how to use Fibonacci Ratio retracements in Elliott Wave analysis is like winning half the battle. We take the same daily chart of the Sterling Pound above. This time, you observe carefully the immediately preceding low to where you placed it earlier. We call this point as “1a” in the chart. Suppose you were to place the lower end of the Fibonacci grid at this level of 1.3690, what do you see then?
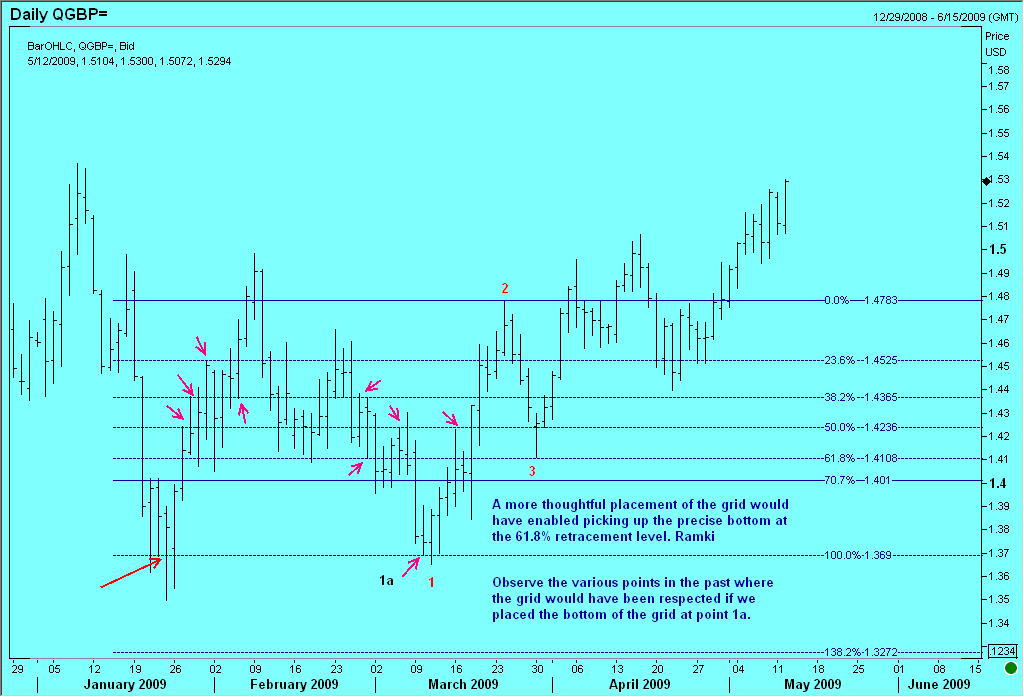
You will see that the grid has seen numerous turns at several of the retracement levels in the past. These turns are shown in the chart above with the help of small arrows. When you pick this level to work your grid, the 61.8% retracement now comes at 1.4108. This is the exact level where the Sterling Pond dipped to before it rallied by over 300 points.
Conclusion
In this article we have discussed how choosing the extremities of a move to develop the Fibonacci ratio retracement grid will often cause you to miss valuable trading opportunities. Such a formulaic approach, even if you choose closing prices, will yield unsatisfactory results.
It is important for the trader to pay attention to where the price action has turned more than just once. The more times it has turned from a given level, the higher should be your confidence that it will work the next time too.
Additionally, if the grid has been respected several times in the past, there is even more reason for it to work again. Go ahead and check out for yourself this superior method, and you will be glad you read this article.
COPYRIGHT © 2026-2028 RAMKI